Building a dbt project from scratch can be tough for some data folks. I looked around, and there’s no blog that covers all the steps we need in one place. So, here it is!
This article will take you through the whole process, from connecting to your data warehouse, and configuring your dbt project to getting CI/CD, dbt Cloud.
Step 1: Setting up the environment & git repo and organizing dbt project
Prerequisites: dbt is installed.
1.1. Creating a git repository
Follow this guideline to create a git repository:
https://docs.github.com/en/get-started/quickstart/create-a-repo
1.2. Setting up Python environment & dbt dependencies
- Set up a Python environment for developing

- Install dbt dependencies
![]()
1.3. Organizing folders according to the dbt project structure
Lastly, structure the files, folders, and models as guideline: https://docs.getdbt.com/guides/best-practices/how-we-structure/1-guide-overview
Step 2: Connecting to the data warehouse using profile.yml files
You’ll need a profiles.yml file containing your data platform’s connection details. In your profiles.yml file, you can store as many profiles as you need. Typically, you would have one profile for each warehouse you use. This file generally lives outside of your dbt project to avoid sensitive credentials being checked into version control, but profiles.yml can be safely checked in when using environment variables to load sensitive credentials.
2.1. Configuring profile.yml file locally
The configuration of the profiles.yml file varies based on the data warehouse you are using. For detailed configuration instructions for each type of data platform provider, please refer to the dbt documentation: https://docs.getdbt.com/docs/core/connect-data-platform/about-core-connections
To set up the file correctly, there are certain concepts you should grasp:
- Understanding targets: A typical profile for an analyst using dbt locally will have a target named dev, and have this set as the default.
- Understanding target schemas: The target schema represents the default schema that dbt will build objects into, and is often used as the differentiator between separate environments within a warehouse. In development, a pattern we’ve found to work well is to name the schema in your dev target dbt_<username>.
- Understanding warehouse credentials: It’s recommended that each dbt user has their own set of database credentials, including a separate user for production runs of dbt – this helps debug rogue queries, simplifies ownerships of schemas, and improves security.

2.2. Using environment variables in profile.yml file
Otherwise, credentials can be placed directly into the profiles.yml file or loaded from environment variables. Using environment variables is especially useful for production deployments of dbt. We can set it up as follows, and this file can be checked into version control:


If the DBT_USER and DBT_PASSWORD environment variables are present when dbt is invoked, then these variables will be pulled into the profile as expected. If any environment variables are not set, then dbt will raise a compilation error.
Details can be found in these guidelines:
https://docs.getdbt.com/reference/dbt-jinja-functions/env_var
Step 3: Defining project-specific configurations in dbt_project.yml
3.1. Defining the directory of the dbt project
3.2. Configuring models

- Setting materialization types for models: It’s a case-by-case setup. In some projects, depending on the data size & the frequency that raw data gets updated, we can materialize base & stg tables as views.
- Adding required tests: unique, not_null, at_least_one are configured as required tests for models in all layers.
- Generating custom database & schema: With the configuration above, the outcome will be:
dbt database design:

dbt schema design:

By default, dbt will generate the schema name for a model by concatenating the custom schema to the target schema, as in: <target_schema>_<custom_schema>. The target.name (target_schema) context variable is used to change the schema name that dbt generates for models. You must additionally ensure that your different dbt environments are configured appropriately. It is recommended that:
- dev: Your local development environment; configured in a profiles.yml file on your computer.
- ci: A continuous integration environment running on Pull Requests in GitHub, GitLab, etc.
- prod: The production deployment of your dbt project, like in dbt Cloud, Airflow, or similar.
Details can be found in these documents: https://docs.getdbt.com/docs/build/custom-schemas, https://docs.getdbt.com/docs/build/custom-databases
Step 4: Implementing CI/CD workflow
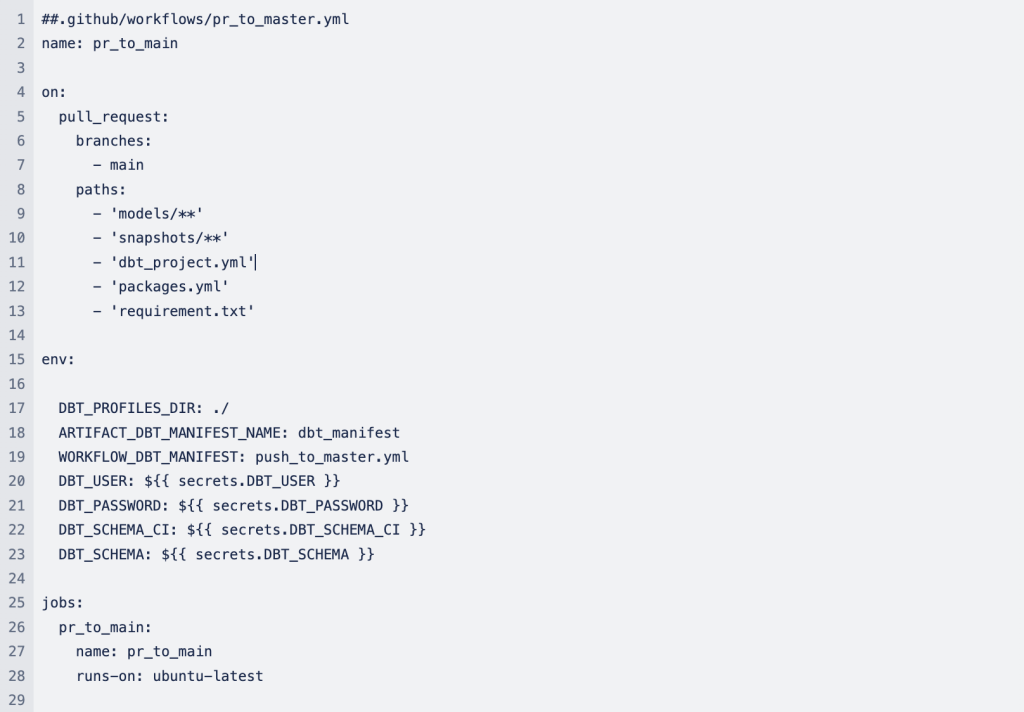
4.1. Adding a Github action workflow to .github folder
Workflow pr_to_master is triggered when a merge request to the main branch is created. It does lint code with sqlfluff, check required tests, run models, and test models.


4.2. Adding secrets in GitHub actions
- Go to project Settings > Secrets and variables > Actions

- Create repository secrets for DBT_USER, DBT_PASSWORD, DBT_SCHEMA_CI, DBT_SCHEMA (to configure target schema for CI run).
Step 5: Setting up dbt Cloud
To set up dbt Cloud, please follow the guidance as follows:
5.1. Connecting data platform dbt Cloud
https://docs.getdbt.com/docs/cloud/connect-data-platform/about-connections
5.2. Configuring git
https://docs.getdbt.com/docs/cloud/git/git-configuration-in-dbt-cloud
5.3. Deployment environments & jobs
https://docs.getdbt.com/docs/deploy/deploy-environments
https://docs.getdbt.com/docs/deploy/deploy-jobs
5.4. Adding environment variables
To configure target schema for production:
- Go to Deploy > Environments > Environment variables
- Create variables DBT_USER, DBT_PASSWORD, DBT_SCHEMA_PROD

Further steps
After the steps mentioned above, you can take the following steps for your dbt project:
- Create testing models to check CI/CD workflow and check whether models are stored in the correct database and schema.
- Migrate & refactor legacy SQL to dbt
Good luck with your dbt project!
- Building a dbt project from scratch - January 15, 2024
- dbt Incremental part 2: Implementing & Testing - January 5, 2024
- Inventory Management & Demand Forecasting for E-commerce Sellers + Tutorial - December 18, 2023


